Are you missing email notifications of form submissions to your site? With a few changes to your website settings, you can easily fix this problem. In this tutorial, we’ll show you how to use Gmail to send WordPress emails for form notifications.
Why You Aren’t Getting Form Emails
By default, WordPress uses the PHP mail() function to send emails generated by WordPress or any contact plugin like WPForms. The most common reason for not getting emails is that your WordPress hosting server is not configured to use PHP mail() function.
You can fix this by using SMTP instead of the PHP mail() function. SMTP (Simple Mail Transfer Protocol) is the industry standard for sending emails reliably.
There are many different SMTP services available, but in this article we will show one that we recommend, Gmail.
To learn more about this issue or to use another method, please see our thorough roundup on How to Send Emails in WordPress using SMTP.
Note: This tutorial’s method is less secure because it stores your Gmail login and password in your WordPress dashboard. Other WordPress administrators have access to this. For a more secure but a little more technical method using Gmail, see How to Fix WordPress Contact Form Not Sending Email Issue.
Using Gmail to Send WordPress Emails
The easiest way to connect WordPress to Gmail is with a plugin. The first thing you need to do is install and activate the plugin WP Email SMTP.
After activation, visit Settings » WP Email SMTP page to configure the plugin settings.
1. Configure WP Email SMTP for Gmail
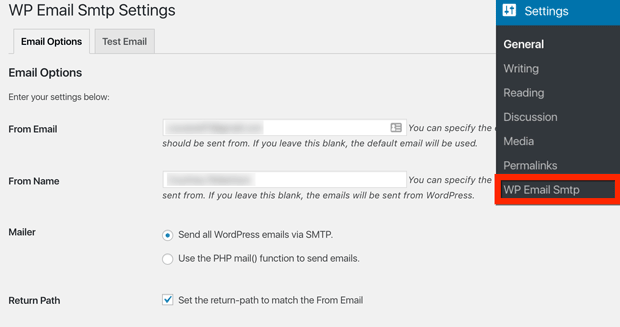
Enter your information into the plugin settings using the list below:
- From Email: type in your Gmail address
- From Name: type in your name
- Mailer: select “Send all WordPress emails via SMTP.”
- Return Path: check the “Set the return-path to match the From Email” option
- Host: type in “smtp.gmail.com” (without the quotes)
- Port: type in “587” (without the quotes)
- Encryption: select “Use TLS encryption.”
- Authentication: select “Yes: Use SMTP authentication.”
- Username: type in your Gmail address again
- Password: type in your Gmail password (this will be visible to all administrator accounts of your site)
2. Allow Less Secure Apps in Google
Now open a new tab in your browser.
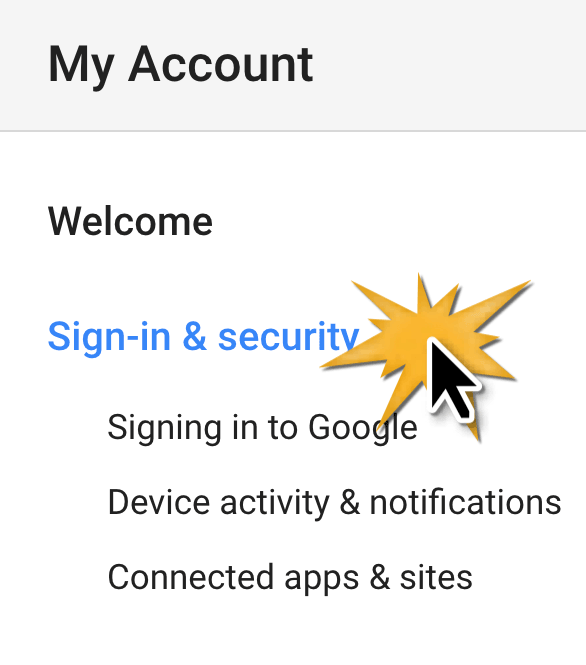
To enable this plugin to work on your site, you will need to go to your account security settings in Google to enable this. Select Sign-in & Security.
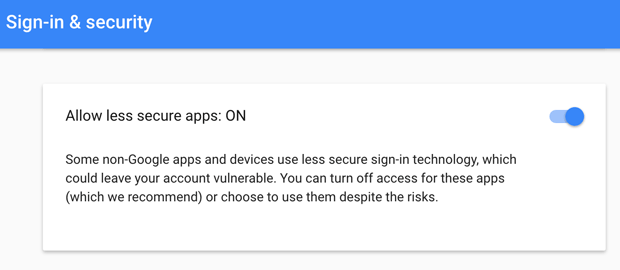
Next scroll to the bottom of the screen. Then enable less secure apps.
3. Send a Test Email from WordPress
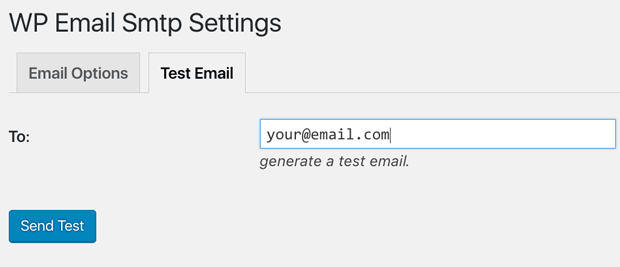
Back in your WordPress dashboard settings for WP Email SMTP, go to the Test Email tab. Next, send a test email to any email of your choice. Then check your email inbox to confirm that the message was received.
That’s all, you have successfully setup your site to use Gmail to send WordPress emails! Now your form notifications will reach your email inbox.
Note: If this method doesn’t work for you, please try another more secure method for sending WordPress form notifications using Gmail.
Looking for more email notification tips? You might also want to check out our guide on How to Send Users Confirmation Emails from WordPress Forms, which will show you how to send a thank you or confirmation message to anyone who submits a form.
What are you waiting for? Get started with the most powerful WordPress forms plugin today.
If you like this article, then please follow us on Facebook and Twitter for more free WordPress tutorials.
本文出自:https://wpforms.com/3-steps-to-use-gmail-to-send-wordpress-emails/


文章评论